
[e4f9a2b7c1] Setting up HTTPS
![[e4f9a2b7c1] Setting up HTTPS](/content/images/size/w1200/2025/11/Screenshot-2025-11-12-at-22-24-54-Account-home-Giannispapcod7@gmail.com-s-Account-Cloudflare.png)
The next crucial phase for your homelab is configuring HTTPS. We’ll reuse the Caddy LXC container you set up in the previous post and rely on Cloudflare to issue the certificates.
To follow this workflow you’ll need two things: a domain name and a free Cloudflare account. Begin by pointing your domain’s DNS to Cloudflare’s nameservers. I won’t walk you through this procedure, Cloudflare’s own
dashboard does a much better job, than I would ever do!
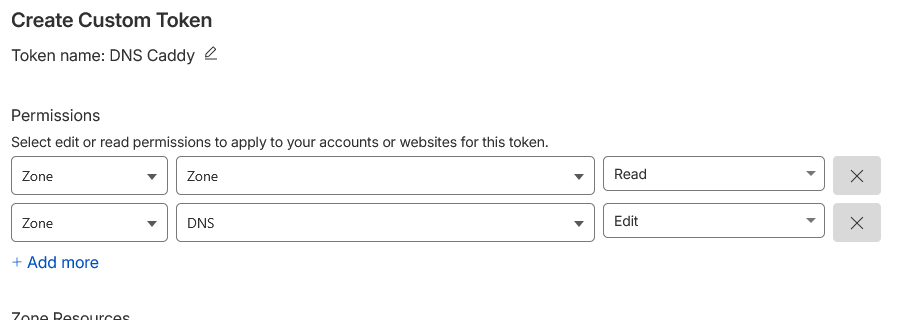
Next, generate a new API token. Go to the API‑Key section in your Cloudflare dashboard and create a token that grants the following rights:
- Zone->Zone->Read
- Zone->DNS->Edit
You can refer to the screenshot below for guidance. Be sure to copy the token to a secure location; you’ll need it shortly.
Next, we have to modify our Caddy setup to incorporate the Cloudflare module, which we can accomplish using the following command.
cd /usr/bin/ && xcaddy build --with github.com/caddy-dns/cloudflare
We’ll execute the command from /usr/bin since that’s where the Caddy binary resides, and that's where we want the new executable to be.
The command will compile Caddy with Cloudflare TLS support, and now we simply need to add our token to the Caddy DNS targets, as shown here:
dns.redpearl.pw {
        tls {
                dns cloudflare TOKEN_HERE
        }
        reverse_proxy 192.168.2.148:80
}
dns-secondary.redpearl.pw {
        tls {
                dns cloudflare TOKEN_HERE
        }
        reverse_proxy 192.168.2.149:80
}
Final step, reload the caddy service and everything should be available quite shortly through https:
systemctl reload caddy
![[119b3e1af2] Network setup](/content/images/size/w600/2025/11/Screenshot-2025-11-03-at-23-42-18-Redpearl.png)
![[1607c63fe2] Initial homelab commit](/content/images/size/w600/2025/08/1024-1365-1.jpg)